概述
在使用 Webpack 构建开发期时,Webpack 提供热更新功能为开发带来良好的体验和开发效率。Webpack 热更新可以做到页面无刷新局部更新能力。Webpack 热更新机制相比传统的直接自动刷新浏览器,可以保持元素当前状态,特别是在编写 css 样式调整布局的时候优势明显,不用反复重新定位元素。
代码实现
- Webpack 配置添加 HotModuleReplacementPlugin 插件
module.exports = {
  plugins: [new webpack.HotModuleReplacementPlugin()]
}
- Webpack Entry 注入热更新代码
webpack-hot-middleware/client这里注入热更新代码是关键,保证服务端和客户端能够通信。
// webpack.config.js 普通应用配置
module.exports = {
  entry:{
    app: [
      'webpack-hot-middleware/client?path=/__webpack_hmr&noInfo=false&reload=false&quiet=false',
      'src/index.js'
    ]
  }
}

// webpack.config.js React应用配置
module.exports = {
  entry:{
    app: [
      'react-hot-loader/babel',
      'webpack-hot-middleware/client?path=/__webpack_hmr&noInfo=false&reload=false&quiet=false',
      'src/index.js'
    ]
  }
}
Node Server 引入
webpack-dev-middlerware和webpack-hot-middleware插件,如果是 koa 引入对应的koa-webpack-dev-middlerware和koa-webpack-hot-middlewareconst devMiddleware = require('koa-webpack-dev-middleware')(compiler, { publicPath, stats: { colors: true, children: true, modules: false, chunks: false, chunkModules: false, }, watchOptions: { ignored: /node_modules/, } }); app.use(devMiddleware); const hotMiddleware = require('koa-webpack-hot-middleware')(compiler, { log: false, reload: true }); app.use(hotMiddleware);代码入口增加热更新处理( 以 React 为例,Vue 内置支持,无需额外配置)
需要安装 react-hot-loader 依赖, 通过 module.hot.accept 接收热更新信息进行组件重新 render
'use strict';
import React, { Component } from 'react'
import ReactDOM from 'react-dom'
import { Provider } from 'react-redux'

import { AppContainer } from 'react-hot-loader';
import createStore from './store';
import Routes from './router'
import './app.css';

const App = () => {
  return module.hot ? <AppContainer><Routes /></AppContainer> : <Routes />;
};

const Entry = () => (<div>
  <Provider store={ createStore() }>
    <App />
  </Provider>
</div>
);

ReactDOM.render(<Entry />, document.getElementById('app'));

if (module.hot) {
  module.hot.accept();
}
热更新一探
首先我们启动 egg-vue-webpack-boilerplate 应用,通过 chrome-dev-tool 看看首次打开页面前端和后端通信是如何建立的?
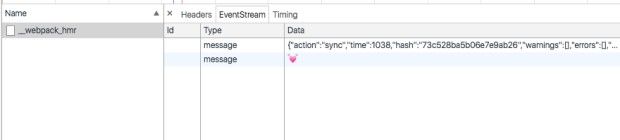
有一个webpack_hmr的请求:http://127.0.0.1:9000/webpack_hmr.
从这张图里面看到几个信息
- 这里看到内容类型为 eventStream,具体是啥请看之后介绍的 EventSource。
- 返回类型为message, 内容关键的有个 action: sync 和 hash:73c528ba5b06e7e9ab26, 这个几个信息在后面会用到。 这里的 hash 为 Webpack 初始化的一个hash,在 vendor.js 文件里面可以看到, 每次页面首次加载时,都会重新生成一个。(var hotCurrentHash = “73c528ba5b06e7e9ab26”)
- 有一个空的message信息,通过观察发现和后面查看代码发现,这个是为了保证后端与客户端通信保持连接,后端隔一段时间会向客户端发送一段信息。
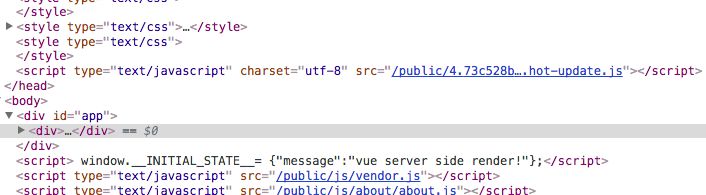
然后修改 about.vue 文件保存后,发现控制台 Webpack 马上重新编译了,UI 无刷新更新了。
1.这时候会发现 Webpack 编译结果多了两个update的文件, 而且文件名包含上面的 hash 信息。4.73c528ba5b06e7e9ab26.hot-update.js 2.93 kB [emitted] about<br />73c528ba5b06e7e9ab26.hot-update.json 43 bytes [emitted]
2.同时,chrome-dev-tool 请求面板下多了两个请求,其中 hot-update.json 为 ajax请求, hot-update.js 为 GET 请求, 也就是插入 script 链接到文档中的script 请求。
3.页面内容插入了 4.73c528ba5b06e7e9ab26.hot-update.js script文件
4.我们来初步看一下两个文件的内容:
- 4.73c528ba5b06e7e9ab26.hot-update.js
{"h":"540f0a679c8bcbf12848","c":{"4":true}}
- 73c528ba5b06e7e9ab26.hot-update.json
webpackHotUpdate(4,{
 (function(module, __webpack_exports__, __webpack_require__) {
    // ...... 此处为 about.vue 组件代码逻辑 /* hot reload */ if (true) {(function () {
        var hotAPI = __webpack_require__(1)
        hotAPI.install(__webpack_require__(0), false)
        if (!hotAPI.compatible) return module.hot.accept()
        if (!module.hot.data) {
          hotAPI.createRecord("data-v-80abbab2", Component.options)
        } else {
          hotAPI.reload("data-v-80abbab2", Component.options)
      ' + '  }
        module.hot.dispose(function (data) {
          disposed = true
      })
    })()}
 })
})
5.进行多次热更新效果

从上面截图可以看到,每次服务端发送的消息(EventStrean) 的 hash 将作为下次 hot-update.json 和 hot-update.js 文件的 hash。
结合上面的分析,接下来从实现到代码层面分析一下整个流程。
热更新实现分析
EventSource 服务端与客户端通信
首先通过查看代码 webpack-hot-middleware/client 发现通信是用 window.EventSource 实现,那 EventSource 是什么东西呢?
EventSource 是 HTML5 中 Server-sent Events 规范的一种技术实现。EventSource 接口用于接收服务器发送的事件。它通过HTTP连接到一个服务器,以text/event-stream 格式接收事件, 不关闭连接。通过 EventSource 服务端可以主动给客户端发现消息,使用的是 HTTP协议,单项通信,只能服务器向浏览器发送; 与 WebSocket 相比轻量,使用简单,支持断线重连。更多信息参考 MDN
Node 端通信实现
Node 通过中间件 webpack-hot-middleware/middleware.js
创建 createEventStream 流
首先看一下中间件核心代码,主要是向客户端发送消息
- compile 发送 编译中 消息给客户端
- build 发送 编译完成 消息给客户端
- sync 文件修复热更新或者报错会发送该消息
// 初始化 EventStream 发送消息通道
var eventStream = {
handler: function(req, res) {
    req.socket.setKeepAlive(true);
    res.writeHead(200, {
      'Access-Control-Allow-Origin': '*',
      'Content-Type': 'text/event-stream;charset=utf-8',
      'Cache-Control': 'no-cache, no-transform',
      'Connection': 'keep-alive',
      'X-Accel-Buffering': 'no'
    });
    res.write('\n');
    var id = clientId++;
    clients[id] = res;
    req.on("close", function(){
      delete clients[id];
    });
},
publish: function(payload) {
  everyClient(function(client) {
      client.write("data: " + JSON.stringify(payload) + "\n\n");
  });
}
}
// 根据 Webpack 编译状态 主动发送消息给客户端
function webpackHotMiddleware(compiler, opts) {
compiler.plugin("compile", function() {
  latestStats = null;
  if (opts.log) opts.log("webpack building...");
  eventStream.publish({action: "building"});
});
compiler.plugin("done", function(statsResult) {
  // Keep hold of latest stats so they can be propagated to new clients
  latestStats = statsResult;
  // 当首次编译完成 和 修改代码重新编译(热更新)完成时发送
  publishStats("built", latestStats, eventStream, opts.log);
});
var middleware = function(req, res, next) {
  if (!pathMatch(req.url, opts.path)) return next();
  // 见下面的 handler 实现,中间件通过 `req.socket.setKeepAlive` 开启长链接通道,
  eventStream.handler(req, res);
  if (latestStats) {
    // 服务端向客户端写入数据,sync 表示告诉客户端热更新已经准备好
     eventStream.publish({
      name: stats.name,
      action: "sync",
      time: stats.time,
      hash: stats.hash,
      warnings: stats.warnings || [],
      errors: stats.errors || [],
      modules: buildModuleMap(stats.modules)
     });
  }
};
return middleware;
客户端通信实现
服务端通过 EventSource 发送消息给客户端了,我们来看看客户端的通信实现。打开 webpack-hot-middleware/client.js 的代码实现:
var source = new window.EventSource('(http://127.0.0.1:9000/__webpack_hmr)');
source.onopen = handleOnline; // 建立链接
source.onerror = handleDisconnect;
source.onmessage = handleMessage; // 接收服务端消息,然后进行相应处理
Node端会主动发送消息给客户端, 客户端 EventSource 关键代码处理消息代码如下:
function processMessage(obj) {
  switch(obj.action) {
    case "building":
      if (options.log) {
        console.log(
          "[HMR] bundle " + (obj.name ? "'" + obj.name + "' " : "") +"rebuilding"
        );
      }
      break;
    case "built": // 这里没有break,所以 编译完成会执行 build 和 sync 逻辑
      if (options.log) {
        console.log(
          "[HMR] bundle " + (obj.name ? "'" + obj.name + "' " : "") +
          "rebuilt in " + obj.time + "ms"
        );
      }
      // fall through
    case "sync":
      processUpdate(obj.hash, obj.modules, options);
      break;
    default:
      if (customHandler) {
        customHandler(obj);
      }
  }
}
上面 building, built, sync 三种消息于服务端发送的消息对应, 这样就完成了服务端和客户端通信。因 build 的 action 时,build case 没有 break,所以当修改文件时,编译完成发送 build 消息时,会依次执行 build 和 sync 逻辑, 也就是进入processUpdate 流程。processUpdate 接收到信息( hash, module) 之后, 进入 module.hot.check 和module.hot.apply 流程。
客户端热更新
首先我们再来看看 module.hot 初始化实现逻辑
module.hot 初始化
webpack_require 函数定义时,通过 hotCreateModule 为每个 module 初始化 hot 逻辑
function __webpack_require__(moduleId) {
  var module = installedModules[moduleId] = {
    i: moduleId,
    l: false,
    exports: {},
    hot: hotCreateModule(moduleId), // 前端通过 ajax 获取热更新文件内容
    parents:xxxx,
    children: []
  };
  return module.exports;
}
hotCreateModule 实现
function hotCreateModule(moduleId) {
  var hot = {
    accept: function(dep, callback) {
    },
    check: hotCheck,
    apply: hotApply,
    status: function(l) {},
    .....
  }
  return hot;
}
hotCheck:前端通过 ajax 获取热更新文件内容
从 热更新一探:[进行多次热更新效果] 上面截图可以看到,每次服务端发送的消息(EventStrean) 的 hash 将作为下次 hot-update.json 和 hot-update.js 文件的 hash。也就是下面客户端更新当前
hotCurrentHash 值,作为下次的 hot-update.json 和 hot-update.js 更新请求。
function hotCheck(){
    return new Promise(function(resolve, reject) {
        var __webpack_require__.p + "" + hotCurrentHash + ".hot-update.json";
        var request = new XMLHttpRequest();
        request.open("GET", requestPath, true);
        request.timeout = requestTimeout;
        request.send(null);
        request.onreadystatechange = function() {
          if(request.readyState === 4 && request.status === 200){
            reject(new Error("Manifest request to " + requestPath
            + " failed."));
          }else{
            resolve(JSON.parse(request.responseText));
          }
        });
    }).then(function(update) {
      // {h: "dcc99b114b8c64461a2e", c: {5: true}}
      // 新的hotUpdateHash
      hotUpdateNewHash = update.h;
      // 向文档插入 hot-update.js script
      hotEnsureUpdateChunk();
    });
},
hotEnsureUpdateChunk 实现
hotEnsureUpdateChunk 函数的逻辑是向 HTML 文档插入 hot-update.js script 脚本。 hotEnsureUpdateChunk 调用 hotDownloadUpdateChunk 函数
function hotDownloadUpdateChunk(chunkId) {
    var head = document.getElementsByTagName("head")[0];
    var script = document.createElement("script");
    script.type = "text/javascript";
    script.charset = "utf-8";
    script.src = __webpack_require__.p + "" + chunkId + "." + hotCurrentHash + ".hot-update.js";
    head.appendChild(script);
}
开启更新机制
开启热更新构建后, 每个 Vue 组件构建的代码都有下面这么一段 hotAPI 代码:
/* hot reload */
Component.options.__file = "app/web/page/about/about.vue"
if (true) {(function () {
var hotAPI = __webpack_require__(3)
hotAPI.install(__webpack_require__(0), false)
if (!hotAPI.compatible) return
module.hot.accept()
if (!module.hot.data) {
  hotAPI.createRecord("data-v-aafed0d8", Component.options)
} else {
  hotAPI.reload("data-v-aafed0d8", Component.options)
' + '  }
module.hot.dispose(function (data) {
  disposed = true
})
})()}
createRecord 和 reload 触发 UI 更新
获取 Vue 组件的 render,重新 render 组件, 继而实现 UI 无刷新更新。
function makeOptionsHot(id, options) {
  if (options.functional) {
    // 获取组件的render 方法,重新 render
    var render = options.render
    options.render = function (h, ctx) {
      var instances = map[id].instances
      if (instances.indexOf(ctx.parent) < 0) {
        instances.push(ctx.parent)
      }
      return render(h, ctx)
    }
  } else {
    injectHook(options, 'beforeCreate', function() {
      var record = map[id]
      if (!record.Ctor) {
        record.Ctor = this.constructor
      }
      record.instances.push(this)
    })
    injectHook(options, 'beforeDestroy', function() {
      var instances = map[id].instances
      instances.splice(instances.indexOf(this), 1)
    })
  }
}
热更新流程总结
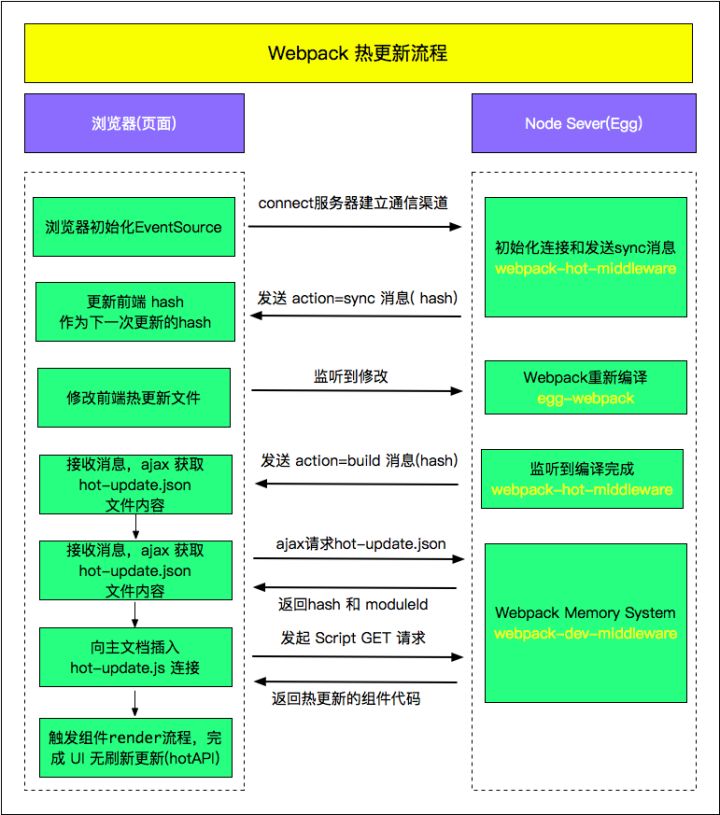
- Webpack编译期,为需要热更新的 entry 注入热更新代码(EventSource通信)
- 页面首次打开后,服务端与客户端通过 EventSource 建立通信渠道,把下一次的 hash 返回前端
- 客户端获取到hash,这个hash将作为下一次请求服务端 hot-update.js 和 hot-update.json的hash
- 修改页面代码后,Webpack 监听到文件修改后,开始编译,编译完成后,发送 build 消息给客户端
- 客户端获取到hash,成功后客户端构造hot-update.js script链接,然后插入主文档
- hot-update.js 插入成功后,执行hotAPI 的 createRecord 和 reload方法,获取到 Vue 组件的 render方法,重新 render 组件, 继而实现 UI 无刷新更新。
关键代码